Guide
Overview of Windows tips and tricks
by Martin Jud
Microsoft is squeezing more and more advertising into Windows. On the plus side, you can disable ads manually or automatically using a third-party tool.
In mid-April 2024, Microsoft began testing ads on the Windows 11 Start menu. After just 12 days of testing, the company decided to release app recommendations to the general public via an update. An update that – at least for now – is optional.
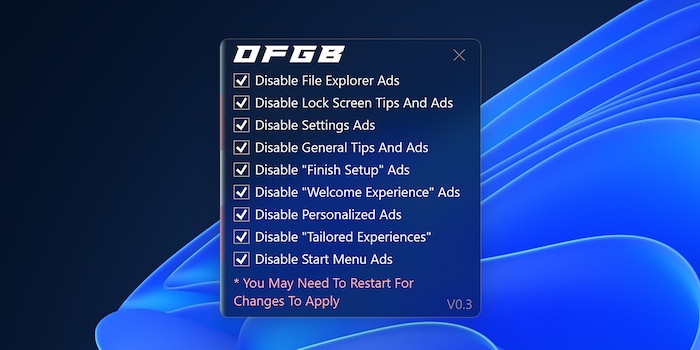
But this is only the tip of the iceberg. Microsoft keeps finding ways to shoehorn advertising into Windows. The list of ads is getting longer and longer. Fortunately, though, they aren’t being forced on us just yet. You can disable ads in various places in your settings. Alternatively, you can save yourself a few clicks by using the Oh Frick Go Back tool. I’ll give you some more information on that in the final section of this article.
There are various ways to disable ads in different areas of your settings.
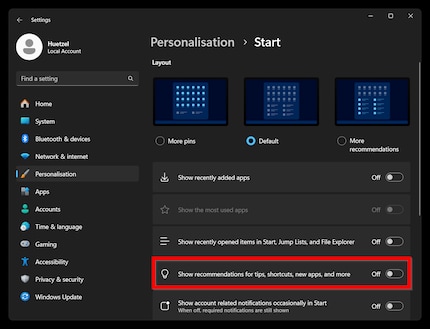
You can disable Start menu app recommendations under
Settings > Personalisation > Start.
The option you’re looking for is called
«Show recommendations for tips, shortcuts, new apps and more».
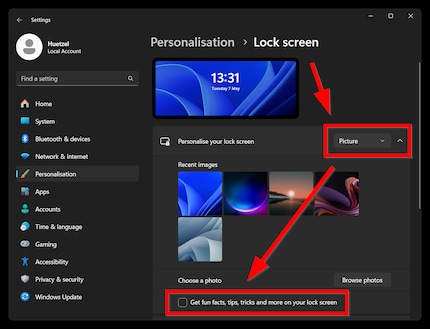
You can disable lock screen ads (also known as «fun facts, tips, tricks and more on your lock screen»), under
Settings > Personalisation > Lock screen.
Then go to
Picture under «Personalise your lock screen».
After that, uncheck the box next to
«Get fun facts, tips, tricks and more on your lock screen».
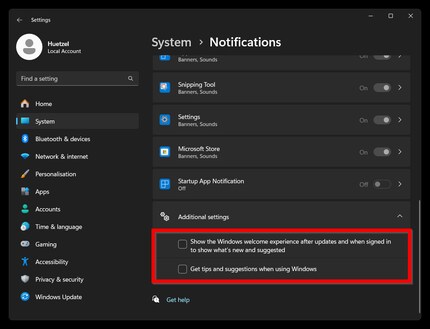
You can disable advertising included in the welcome experience, set-up suggestions and other tips under
Settings > System > Notifications.
Scroll to the bottom and open the
Additional settings tab.
After that, uncheck the box next to:
The second option is only displayed if you haven’t yet finished setting up your device.
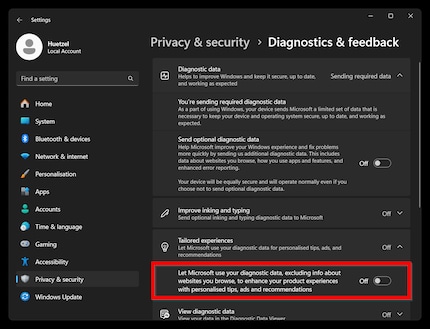
Using diagnostic data to improve your product is one thing. Using it for advertising purposes, however, is a different kettle of fish. That’s why you should go to
Settings > Privacy and security > Diagnostics and feedback.
Once there, you can stop optional diagnostic data from being sent to Microsoft. Then there’s the option for diagnostic data to be used for personalised ads. To disable this, open the
Tailored experiences tab.
Deactivate the slider next to
«Let Microsoft use your diagnostic data, excluding info about websites you browse, to enhance your product experiences with personalised tips, ads and recommendations».
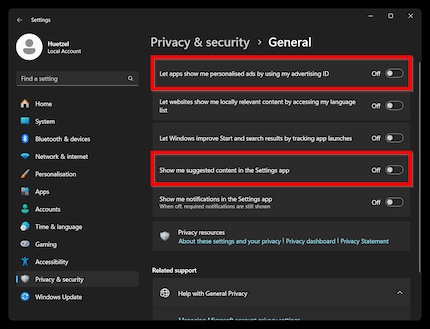
If you don’t like personalised ads or if you’d rather deactivate content suggestions in the settings app, go to
Settings > Privacy and security > General.
Deactivate the slider next to:
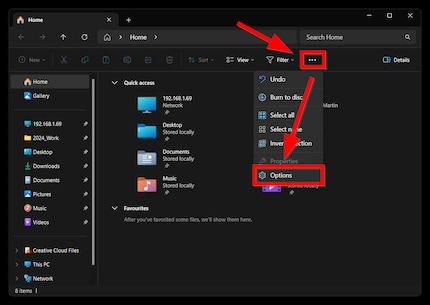
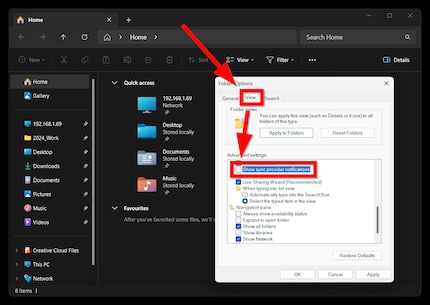
Here’s how to get rid of ads in Windows Explorer:
If you don’t want to click through all these settings in order to disable ads, you can also do it automatically. One way is by using the OFGB tool that xM4ddy has released on Github. Simply download it here.
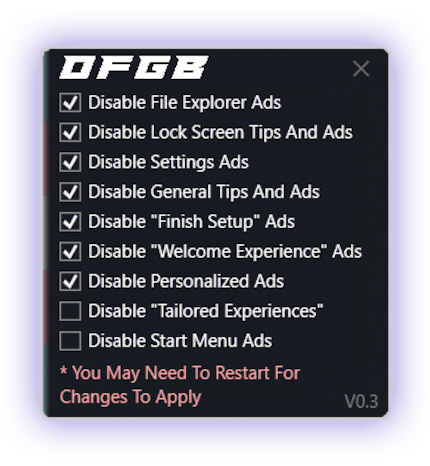
When you run the program, you might get a warning from Microsoft Defender SmartScreen or some other antivirus program. To continue, you’ll need to confirm that you’re aware of any risks. The tool makes changes to Windows registry.
Need more Windows tips? In the article below, you’ll find links to all previously published editions of this series.
I find my muse in everything. When I don’t, I draw inspiration from daydreaming. After all, if you dream, you don’t sleep through life.