
Product test
Insta360 X3: handy on fair-weather trips
by Michelle Brändle
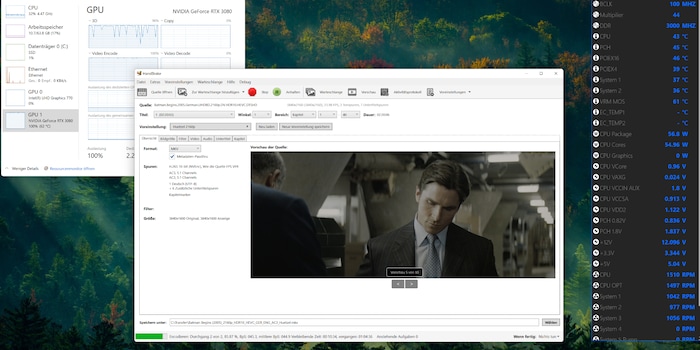
In the past, VHS tapes, CDs and DVDs used to pile up unattractively. Today, UHD HDR films occupy a lot of memory with up to 100 gigabytes each. What helps: conversion with HandBrake.
In this post you will learn how to convert UHD HDR videos using the High Efficiency Video Coding Codec (H.265/HEVC) with HandBrake and your CPU or GPU. Personally, I use this to bring ripped or downloaded copies of my films down to a smaller file size with little loss of quality. For example, shrinking a movie file from 80 gigabytes to 20 gigabytes so that the result is something between streaming quality and that of the original file.
My current favourite programme for converting videos is HandBrake. But it has one drawback: if I want to convert 10-bit HDR (High Dynamic Range) videos, I can do it with my processor, but not by using my graphics card, which I have recently started to prefer for converting.
Now I am using HandBrake.
Now I have found a solution; the snapshot builds of HandBrake. These not-yet-final versions of the programme contain functions that are otherwise (still) missing. And thus also support for 10-bit colour depth when converting with Nvidia GeForce graphics cards. However, 12-bit colour depth can still only be converted with the processor. And those hoping for support for Dolby Vision or HDR10+ will also be left empty-handed. You can use the improved HDR standards as HDR sources thanks to backwards compatibility, but you cannot convert to these formats with HandBrake.
HandBrake is an open-source, free programme for transcoding video files. It supports the video codecs (conversion algorithms) H.265 (HEVC), H.264 (AVC), MPEG-4, MPEG-2, VP9, VP8 and Theora. When converting HEVC and AVC, the programme can make use of hardware acceleration. MKV, MP4 and WebM are supported as file containers. A number of audio codecs and subtitle formats are also supported. Thus, audio passthrough - i.e. passing through the original audio track without converting it again - is possible for AC-3, E-AC3, FLAC, DTS, DTS-HD, TrueHD, AAC, MP3 and MP2. If you want to re-encode the audio track, you can do so with AAC as well as HE-AAC, MP3, FLAC, AC3, E-AC3, Opus and Vorbis.
.
So that you don't have to make all the settings yourself, the programme offers you preset profiles for web videos, the Matroska format, hardware encoders or a specific end device. Then you select Android, Apple, Chromecast, Playstation or something else and the desired resolution. Alternatively, you can configure everything yourself and convert your UHD videos with up to 12-bit colour depth.
You can download HandBrake here for Windows, Linux and macOS. Since this media converter comes with a graphical interface, it is convenient to use even for beginners.
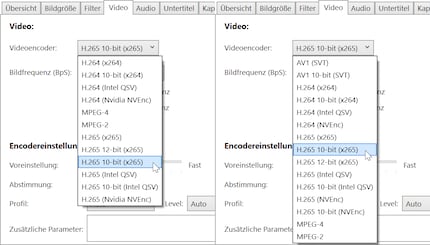
If, like me, you want to convert videos with a current Nvidia graphics card instead of the processor, you will need a snapshot build of HandBrake so that the 10-bit HDR conversion with the Nvidia Encoder (NVEnc) works. You can get it here. Please use this version only at your own risk, as it is not yet final. Furthermore, for the chip to support 10-bit and B-frames, you must have a GeForce GTX 1650 Super or better
.
In the early 00s, I ripped DVDs and converted them to 650 or 700 megabyte size. Then I burned them onto CDs. At that time, my PC was at times calculating day and night for the conversion of films with originally 720 x 576 pixels. For all the nostalgics: I used the DivX 3.11a codec and the SmartRipper and FlasKMPEG software for this purpose.
Today, converting a film can still take many hours to days, depending on the processor and settings. But there are also methods that are somewhat faster but do not offer a perfect result in terms of quality or file size. But one that can hold a candle to the quality of streaming services and takes only a fraction of the time that extreme encoding settings otherwise do.
In the following picture you can see the HandBrake settings of the software-based CPU conversion with HEVC. I've been using it for my movies until now because I didn't know how well I liked Nvidia's graphics card conversion. And because the conversion with the processor offers a big advantage: 2-pass encoding, or encoding in two passes.
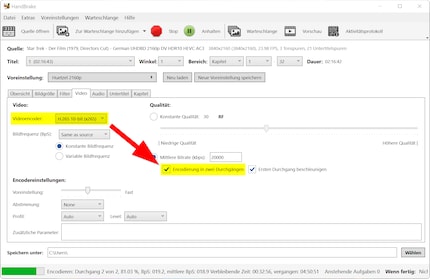
If you want the best possible quality with the smallest possible file size, 2-pass encoding is the way to go. The video material is analysed in a first pass and the information is saved in a log file. Put simply, the encoder looks at where, for example, fast film scenes with many frame changes are. Like image material with a lot of detail or grain, these need more storage space per second and thus a higher bit rate. And so in the second pass, where the new film file is then also written, the best target bit rate per scene can always be aimed for - or the intended target storage capacity and average bit rate can be maintained.
How much memory per second of film may be used is variable in 2-pass encoding - as it is when converting in one pass using the average bit rate. And especially when converting in one pass due to a set quality value, where there is no bitrate default. However, 1-pass encoding is less predictive than 2-pass encoding, resulting in a larger file size and/or less quality.
What speaks against 2-pass encoding: The conversion takes almost twice as long. You can counteract this by activating the turbo option. In the picture above, you can see the tick next to "Speed up first pass". This saves you a little time on the first pass at the cost of practically invisible losses in quality - which doesn't make the roast any fatter in terms of time. For me, however, converting with the above settings takes about 140 minutes per hour of film. So five and a half hours for "Star Trek: The Movie" from 1979 in the Director's Cut. And that's despite the fact that I'm using a current Intel Core i7-12700K and have selected the sixth-best and fifth-worst encoder preset "Fast".
More detailed information on the settings follows below in the step-by-step instructions. The selected average bit rate of 20 000 kilobits per second on the image that can be seen resulted in a 24 gigabyte MKV file. Originally, the video track was 74.7 gigabytes and had an average bit rate of 72.9 megabits per second. The new video track is 20.5 gigabytes in size and has an average bit rate of exactly 20 megabits per second.
Of course, apart from one or two passes, the quality always depends significantly on the bit rate. If the bit rate is high enough, the target video is spared unsightly artefacts. On Netflix, films are streamed at bit rates of up to 20 megabits per second - at UHD resolution with HDR10 and in some cases Dolby Vision. In contrast, a UHD Blu-ray can reach up to 128 megabits (16 megabytes) per second. If you're used to Netflix, Amazon Prime or Disney+, a target bitrate that's the same or slightly higher should theoretically give a similarly good result.
If you opt for processor-assisted conversion in one pass, your PC will only need about half the time compared to 2-pass encoding. What can be even faster is conversion with a graphics card. Intel, AMD and Nvidia offer corresponding encoders. However, as far as I have been able to find out so far, I can only recommend Nvidia's encoders as a substitute for converting with a CPU for reasons of quality. And only with the encoder preset "Slowest". With this, from an average bit rate of around 15 megabits per second, I have the feeling that the quality is at least as good as Netflix. I find it comparable to the "Fast" preset for a CPU conversion in one pass. However, with an Nvidia GeForce RTX 3080, the conversion only takes about 30 minutes per hour of footage.
After all the theory, it's time for practice. We'll use the UHD HDR version of "Batman Begins" as an example. An MKV file with a size of 58 gigabytes.
1. Start programme and open video source
.
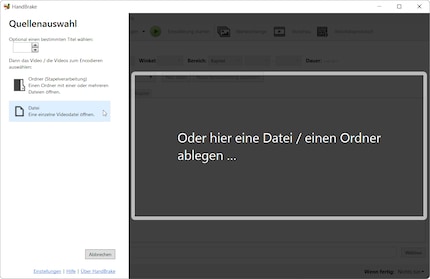
After starting HandBrake, you can add a single video or a folder (batch processing) as a source.
2. Load preset and define container
.
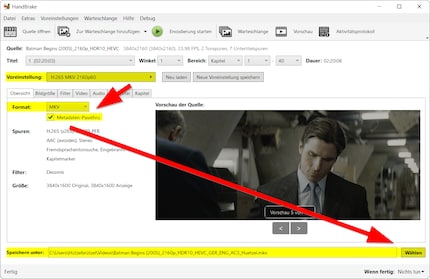
After opening the source, you land on the "Overview" tab, where you see a preview of the film and can select the format or the container. Above this, you will see a selection field called "Preset", in which the aforementioned profiles are stored. Now it is a matter of selecting a profile that is reasonably suitable for the desired result. Alternatively, you can also set everything yourself without a profile, but this is quicker.
Select the preset.
Select the default setting "H.265 MKV 2160p60" and then decide on a format. Personally, I always go for the MKV container, as all my players support this format and it is also top-notch in other respects. You can think of MKV as a container into which you put the video track, various audio tracks and any subtitles. If you want to edit the file afterwards without re-conversion, i.e. exchange an audio track or something else, this is possible with the software MKVToolNix. Alternatively, you can choose MP4 as the container, which is especially recommended for Apple devices.
Please also make sure that the "Metadata passthru" checkbox is activated. After that, define the name and location of the destination file.
3. define image size
.
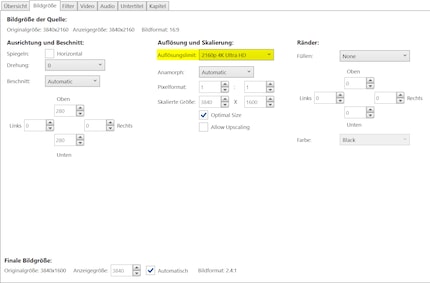
In the "Picture size" tab, make sure that the resolution limit matches your target. If you want UHD resolution, it must say "2160p 4K Ultra HD". If you have loaded the presets in the second step as suggested, everything should already be set correctly and look like this screenshot. If you leave the cropping on "Automatic", HandBrake will automatically remove the black bars above and below the image, which saves storage space and is recommended.
4.4. Filters that can be applied if needed.[[image:68621327]]Under "Filter" you can leave everything on "Off". Unless you know what you're doing.5.1 Encode Settings for Conversion with Processor[[image:68621392]]In the "Video" tab, select "H.265 10-bit" for the video encoder for conversion with processor. If you have a 12-bit source, there is also the "H.265 12-bit" video encoder. Since I personally can hardly tell the difference between 10 and 12 bit colour depth, I don't use it yet. And also not because it is more time-consuming.Apart from the video encoder, you set the frame rate to "Same as source" so that the FPS of the original file are adopted. Under encoder settings, you can set the preset value to any position. I recommend the value "Fast", because with it a good quality can be achieved within an acceptable time. However, you must also define a sufficiently high average bit rate. This directly influences the final file size. I decided to aim for an average of 15 000 kilobits per second.Alternatively, you can turn away from the kilobit settings and set a CRF value (CRF: Constant Rate Factor) for the item "Constant Quality" - instead of CRF, RF or CQ can also be used. This is actually the better method anyway, as the video material then constantly receives the appropriate bit rate based on a quality value, without having to adhere to an average storage value. However, this makes it difficult to estimate the target file size. On the other hand, the method ensures that the image quality is always the same for fast and slow image changes. For UHD resolution, a CRF value of 28-22 is recommended in the Handbrake documentation. Depending on how action-heavy a film is, a value below 22 can also make sense. If I think of the most brilliant film of the year, "Everything Everywhere All at Once", after receiving my Blu-ray I will probably tackle it with a value of 18 due to the almost epilepsy-inducing, rapid image changes and see what comes out. The smaller the value, the less compression - the better the quality and the bigger the file..[[image:68621393]]If, after reading the theory, you have decided to do an ultra-long 2-pass encoding, define a medium bitrate and tick the "Encode in two passes" box. If you want to perform the first encoding pass with turbo, you also set a check mark at "Accelerate first pass". 5.2.5.2 Encoding settings for conversion with Nvidia graphics card.[[image:68626529]]For conversion with an Nvidia graphics card, select "H.265 10-bit (NVEnc)" for the video encoder. For the frame rate, select "Same as source" so that the FPS of the original file are adopted. For the encoder settings, you should select "Slowest" for the preset value and leave it at that. It is not worthwhile to use a faster variant here, as the Slowest value also encodes relatively quickly and offers the best quality on top of that.As with the processor conversion, a quality value of 0 to 51 or a medium bit rate is also possible as a default here. As mentioned above, for most films I am happy with a medium bit rate of 15 megabits per second. With newer and faster edited films, I sometimes go to 20 or 25 megabits. As far as the quality value is concerned, I have had similar experiences with the Nvidia encoder as when the processor encodes. A good starting value for me is 23, although depending on the film, I sometimes go as low as 18.For this article I converted the Batman film with the mean value and the quality values 23 and 18: The mean of 15 000 kilobits resulted in an average bitrate of exactly 15 megabits per second (15.8 gigabytes of video track). With CRF 23, a similarly good-looking result comes out with 14.3 megabits per second (15 gigabyte video track). With CRF 18, the result is 18.9 megabits per second (19.9 gigabyte video track) and an image that is barely distinguishable from the original. However, all this can vary depending on the film material. The conversion took around one hour and 15 minutes each - 32 minutes per hour of footage.6. Select audio tracks and convert if necessary.In a moment we have done it. Under "Audio" you can add the audio track or tracks using the "Tracks" drop-down menu and determine whether they should remain in the original format or be converted to another.[[image:68626923]]As shown in the screenshot, I have added one German and one English audio track. They are in DTS-HD, which unfortunately is not supported by practically any of my end devices. Therefore, I have assigned a new codec to them. I want the audio tracks to be in Dolby Digital 5.1 after conversion. Therefore, I choose AC3, the best possible bit rate of 640 kilobits per second and 5.1 channels.If you want to accept an audio track as it is, make sure that you select the same codec and that it is followed by "Passthru".[[image:68626960]]<7. select subtitles.[[image:68627291]]In the "Subtitles" tab, add the desired texts via the "Tracks" drop-down menu. You should keep your hands off the burn-in option. It allows you to render the text directly into the video image. This means that the text then appears during playback even without subtitle selection and can no longer be removed. More useful is the default option I have set for the subtitle with the name "German Forced". The Forced subtitle only contains translations of passages spoken by others or time and place information in the film. Therefore, I want it to be activated by default - matching the default soundtrack, which is also German..8. Start conversion and wait.[[image:68627300]]Finally, you may now press the green button at the top of the programme and start encoding.With a little luck, you will get a nice result in a few hours or days.
I find my muse in everything. When I don’t, I draw inspiration from daydreaming. After all, if you dream, you don’t sleep through life.